Selecting and Preparing Shinai
- Selecting Shinai
- Preparing the Shinai - First Strike
- Assembly
- Maintenance
Selecting Shinai
There are many things to consider when selecting shinai. Most are a matter of personal preference. Things to consider are, is the shinai for training or tournament, a large handle or small, balance, large diameter body or small, heavy or light. All these things have to do with your style of kendo, what type of practice, age, technical and physical ability. Most important is do you have a large number to select from or do you have just a few to pick through. Most of us outside Japan do not have the luxury of going down to the local kendo store to pick through a rack of shinai. We most often make do with a small selection or buy them mail order.
When buying shinai a good way to stretch your dollar and make your shinai last is to buy a matched set of 3 or more. Match them for size and location of the node. By doing this you get as many as 9 shinai out of the 3. Each time a stave fails you can easily substitute one back in. If ordering by phone ask the seller to match the nodes (fushi) for you. When buying later shinai try to match them to the ones you have.
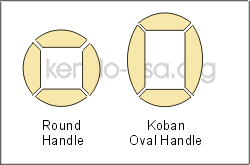
Shinai are available with two types of handles. The round handle that is commonly used. Also there is the koban oval handle. The name for the shape comes from old Japanese coins that had the koban shape. Koban shinai have a nice feel to them for use and help you to have a correct grip. They are generally more expensive than the average or better grade round handle shinai. Of course there are very expensive high quality round handle shinai. A problem with using koban shinai is when you have to replace a side stave only another koban stave will fit because it is wider. The top and bottom stave can usually be replaced from a regular shinai. So there are tradeoffs when using koban shinai. A way around this is to buy a carbon shinai for lots of money. The feel is different but they last.
First Strike
Yes you want to make that first strike with your new shinai. But wait, it probably isn't ready yet. Usually the shinai does not come ready to go. Some of the very expensive shinai do. So first lets take that shinai apart and prepare it properly for that first strike.
Disassembly of the shinai is simple. First untie the tsuru at the handle and then all the pieces should slip off. I say here that they should slip off. A properly tied nakayui will be tight against the take and difficult to slip over the node. You will have to work it over the node. It will probably loosen up and necessitate retying it anyway. Removing the handle can be a chore as well. Some shinai handles are put on using a machine, which grasps the handle and pulls/pushes it on. If the handle is undersize then it takes a lot of work to get it off. You have to work it down from the opening a little at a time until it will slide off. Push downward on it to make a wrinkle and then work the wrinkle down towards the end and so on.
As a rule once the handle is removed the bamboo will not fall apart on a new shinai. Some have the staves glued together at the handle and you will have to peel them apart carefully so the staves will not be damaged. Also the chigiri, the little metal square in the handle helps to hold the take together. Be sure to not lose the chigiri. It keeps the handle aligned and prevents it from collapsing. Once apart, lay the staves out in order and number them if they are not numbered already so they can be put back together in the right order.
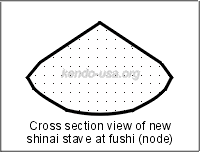
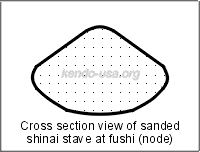
The edge of new shinai staves come to a point from the being planed and fitted together. You want to round this over so it will reduce the chance of the bamboo fraying and splintering during use. On the inside of the node it comes to a point also. You may prefer to round this slightly as well to allow the bamboo to move. If you round the nodes down completely then you remove a bearing surface for the bamboo staves to move against each other and distribute the force of the strike.
There are several tools available for working on the shinai. Different grades of sandpaper will generally do the job just as well and you do not have to worry about accidentally cutting or gouging the stave. You can use 100 grit for faster material removal and 150 or 220 grit for finer sanding.
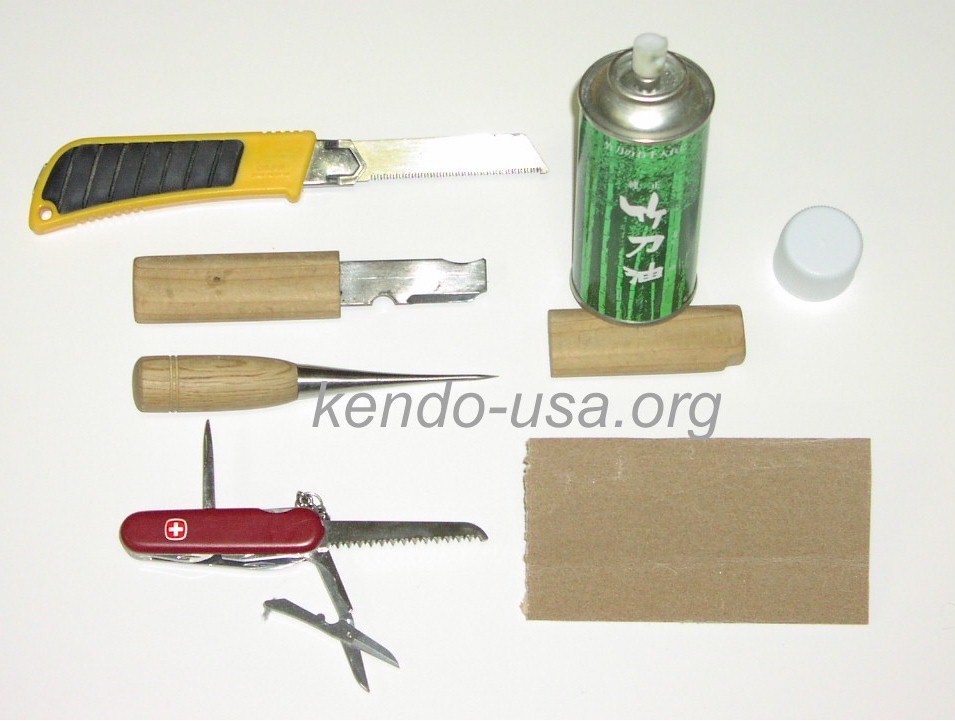
Essential Tools for Shinai. Retractable Saw, Shinai Knife, Awl, Swiss Army Knife (awl, saw, scissors, etc.), Shinai Oil, Sandpaper
Once sanding is complete the staves must be lubricated in some way. Use a light oil or wax. This is a personal preference. Both will allow the bamboo staves to move against each other. The oil will give the bamboo greater longevity. You can purchase a spray can of oil from many kendo stores for this purpose or use a light mineral or vegetable oil. Spray the oil directly onto the back of the stave or on a cloth and rub it into the back and sides. The staves can also be soaked in a tube made from plastic pipe. Linseed oil works well but will add weight and may change the balance of the shinai. The spray can is easiest. One opinion is to let it the oil soak in for 3 days before using the shinai. I'm too lazy to do this.
After oiling, reassemble the shinai and you're ready for your first strike.
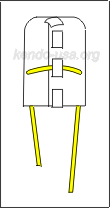
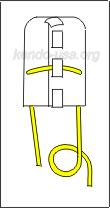
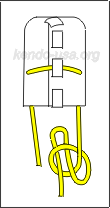
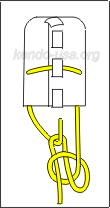
Assembling the Shinai
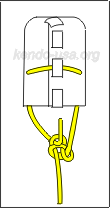
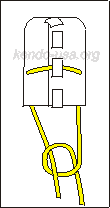
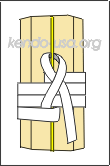
Here are two of several methods for tying the knot for the sakigawa. The first is a slip knot so it is important to tighten it well and make sure the tsuru is tied to the correct tension on the shinai.
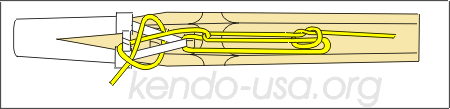
Tying the Sakigawa
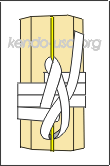
Tying the Sakigawa - Method 2
Insert the Sakigomu
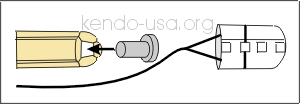
Select the right size sakigomu for the shinai you are using. The sakigawa should fit tightly on the end and not twist during use. It must also be of minimum length as per the shinai regulations to prevent it from coming off during practice.
Carbon shinai require a special sakigomu. Visit the Hasegawa Co. web page for contact information.
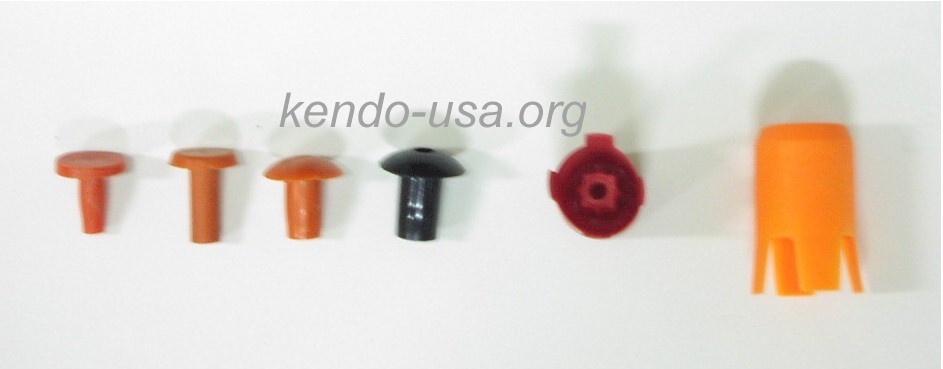
Different size sakigomu and the improved Hasegawa carbon shinai sakigomu.
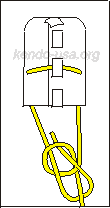
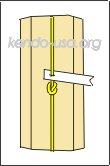
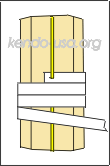
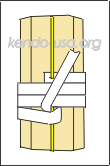
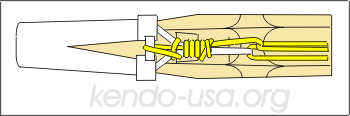
Tying the Nakayui
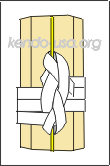
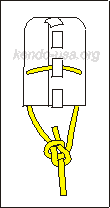
Tying the Tsuru
Tsuru Tension
When you tie the tsuru how tight is tight enough. The shinai flexes a lot during a strike. Too loose and the sakigawa can pop off creating a danger. An over tightened tsuru can cause the shinai to start to curve. When you lift the tsuru away from the shinai between the handle and the nakayui, there should be no more than two fingers width of space. One to one and a half fingers width is best.
Maintaining Your Shinai
It is important to continually check your shinai for any problems that might occur. The shinai should be checked every practice for cracks, fraying or splinters. The tension of the tsuru should also be checked. A tsuru that is loose can allow the sakigawa to come off during practice. If a sakigawa comes off it can allow the staves to enter through the men gane causing injury. The sakigawa should be checked for wear on the bottom and the lacing on the end for signs of opening up. The shinai must be repaired before being used again. New shinai should be checked after first use to ensure that nothing has stretched and loosened up such as the tsuru.
Replacing a Broken Stave
There are a variety of opinions about replacing staves and rotating them. Ask three people and get four opinions. I change out my staves and rotate them as well and have found no difference in the how long the shinai lasts. They run from breaking the first time you use them to lasting up to two years. Some bamboo is just better than other.
To replace the stave line it up with the ends of the shinai and press it against the chigiri (metal square) to make a mark. Cut in the new groove. Be sure and select a replacement stave that matches as closely as possible to the shinai you are repairing. It should match for size and width.
What to do with a Loose Handle
Sometimes you have a handle that is a little too large and will twist on the shinai during use. You can tighten the handle up with some success by wringing it. By some success I mean that this doesn't always work. I have had good luck most of the time. Remove the handle and wring it tightly like a towel. It should help take the slack out of it. Try it on and see how it fits. If that fails then the handle will have to be changed.
Copyright © www.kendo-usa.org All Rights Reserved.